
First of all, I use Photoshop Elements 3, so I work with layers. Since I'm self taught, I tend to wade through each photo effect like a bull in a china cabinet. [Not that bulls actually wade in China cabinets - nor do they even fit... Another cliche that I find, well, curiouser and curiouser. The origin of said cliche being Bull in a China Shop - makes more sense. Yes? But I digress.]
Where was I? Tutorial, yes.
Here are the 3 pictures that I started with, I took 2 at one point in the day and took another one when we came back to the attraction.
 I used the vertical as the original, I sharpened (defogged) it using the Unsharp Mask filter. Then I repeated the process with the other two pictures.
[Since I only have PSE3, I can't run very many actions, or record my own so - A.) I have to repeat the steps on each picture manually and B.) that's why I can't always remember the steps to my photo editing projects.]
Next I cropped the 2 horizontal pictures leaving only what I needed. Now they are ready to add the the original document.
Then I drug the first picture over to the original document to create a new layer.
I changed the transparency to 50% to see my picture underneath. I resized the new layer to match it as best I could to the original picture (background layer) . (You can play with the opacity to achieve the result you want once you have the picture placed where you want it.)
Next I used the Eraser tool set in brush mode at 50% to erase all the edges around the layer until only Harrison was left. (example 1 & 2)
 example 1 - New layer at full opacity, partially erased
 example 2 - New layer at 50% opacity with background layer
 example 3 - Second layer added but not sized yet.
I clicked on the background layer and created a duplicate layer. I moved the copied layer to the top of the layer stack and then erased only the areas where the I wanted the other layers to show through
 example 4 - all layers except the original background, I've erased the areas to allow the other layers to show though leaving a halo effect.
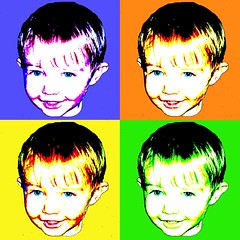
 Finally, I flattened the image, ran the Unsharp Mask one more time and saved it as a new file. The final result
 The final result
I hope I my steps sense, if not feel free to ask me, and if you have an easier way to create this effect link it to the comments!


7 comments:
That is super cool. I will have to try that this weekend. Now, with what situation...
Clever .. now I need to try this... I have PS Elements 4 but havent even attempted to use it because I had no idea how to! Now I do. Thanks!
Good tutorial! I didn't even notice it the first time around...must have been early in teh morning before the coffee kicked in LOL! That is a very fun photo - too cute!
Thanks for the tutorial! I can't wait to find some good ones to try this on!
Cool, cool, cool!
Oooh, and Phil Collins is singing I Don't Care Anymore. I love Phil Collins! It's been a long time since I've listened to him. That was a nice surprise!
Thank you SO much. I am going to try this out soon.
Wow! That is incredible! I 've never tried doing anything like this in PS yet and I have a ton of pics of my daughter I'd love to try this with. Really awesome job on this tutorial. Thanks so much for your visit to my blog (through David McMahon).
Regards,
whodatdare (John)
Post a Comment